- How do you calculate the quality of an image for printing?
- What is the difference between DPI and PPP?
- How and when is the transition from PPP to DPI done?
- What resolution do I need to print a large image?
- For printing in a residence, we suggest having at least an image resolution of 100 DPI
- What happens if we want to enlarge the image?
- The image quality required depends on the distance from which you observe the print
- How to enlarge a low resolution image?
- How to validate that the resolution of your image is good enough?
- What size can you print a vector image?
- How do I find the dimensions of an image on a Windows computer (PC)?
- How do I find the dimensions of an image on an Apple Mac computer?
- Need help printing your images in large format?
Most cameras these days take excellent photos that can be printed at superb resolution. Whether it’s a cell phone or an amateur device, you can often get images of more than 10 mega pixels.
How do you calculate the quality of an image for printing?
The quality of a digital image is calculated in Pixels Per Inch (PPI). So whether in a camera, cell phone or computer, DPI is the measure of resolution used on the printer side.
What is the difference between DPI and PPP?
When it comes to printing, we use DPI which is the abbreviation for Dot Per Inch. The DPI resolution is actually the calculation of the amount of dots the printer will drop onto the medium, in 1 square inch.
Ex. : At 300 DPI, there will be 300 dots printed in 1 square inch.
Ex. : At 300 PPI, there will be 300 dots printed in 1 square inch.
How and when is the transition from PPP to DPI done?
Now that you understand the difference between the two units of measure, how do they interact with each other? It is in fact the printer which will interpret the DPIs sent to it and transform them into DPI.
What resolution do I need to print a large image?
« The important thing to know is that the higher the resolution of your image, the clearer and more detailed the image will be. »
So definitely the higher your resolution the better… However, all devices of course have a limit. The cameras generate images between 72 and 300 DPI and these will have a fixed size (in pixels).
Our professional printers can print up to 1200 DPI in hyper high resolution mode. However, the human eye will not be able to differentiate the quality between 1200 and 300 DPI.
For printing in a residence, we suggest having at least an image resolution of 100 DPI
What happens if we want to enlarge the image?
Starting from a 6 X 4 image, if you decide to print it only 12 X 8, you will halve its resolution. What will this have as an effect? Mathematically, we have just lost 50% of its definition which is huge (in theory). However very often the human eye will not be able to tell the difference when the quality is so high. For example, if you start with a 300 DPI image and enlarge it while keeping a resolution of 150 DPI, you will have to be very close to the image to be able to see the difference. This brings us to our next point which is the distance at which the impression will be observed.
The image quality required depends on the distance from which you observe the print
When printing highway billboards, they are sometimes 20, 40 or even 60 feet wide. Obviously, you can’t have a high resolution given the size of the print.
Distance helps us, because the further away we are, the better we can visualize the entire image. In this kind of printing, you can use a resolution as low as 1 DPI!
Here is a table that will give you a clue of the resolution to aim for in relation to the viewing distance.
Suggested resolution table in relation to viewing distance
| Viewing distance | Suggested resolution |
| 0.6m / 2ft | 300 dpi |
| 1m / 3.3ft | 180 dpi |
| 1.5m / 5ft | 120 dpi |
| 2m / 6.5ft | 90 dpi |
| 3m / 10ft | 60 dpi |
| 5m / 16ft | 35 dpi |
| 10m / 33ft | 18 dpi |
| 15m / 50ft | 12 dpi |
| 50m / 160ft | 4 dpi |
| 60m / 200ft | 3 dpi |
| 200m / 650ft | 1 dpi |
We can understand from this table that it is necessary to use a high resolution (+/- 300 DPI) only if we visualize the print very closely (about 2 feet or +/- 60cm).
As soon as you take a little distance, you can reduce the quality of the image.
How to enlarge a low resolution image?
This question is asked frequently given that we print in large format and nowadays many agencies work more for digital media than for print media.
When we print, the anchor that is placed on our medium has a geometric shape, which is unnatural for the human eye.
When our image resolution is not large enough, we can cheat and add a little blur to the image so that the boundaries of each print point are less noticeable to the human eye. By definition, we add blur so we will lose image quality. However, if this process is used sparingly and the happy medium is struck, better overall visual quality can be appreciated.
How to validate that the resolution of your image is good enough?
First, in order to quickly see how good your image will look when printed, you can start by viewing it at 100%. (CTRL + 1 in Adobe Photoshop) This will get you up to speed on the quality of your image quickly.
Then, to do a real test, you can print a test at the resolution you think you will end up using. Once your proof is printed, hang it on the wall and stand at the distance it will normally be viewed. This will give you a better idea whether your quality is good enough or not. We normally select key sections of the images that are easy to judge. Example: a logo, a face …

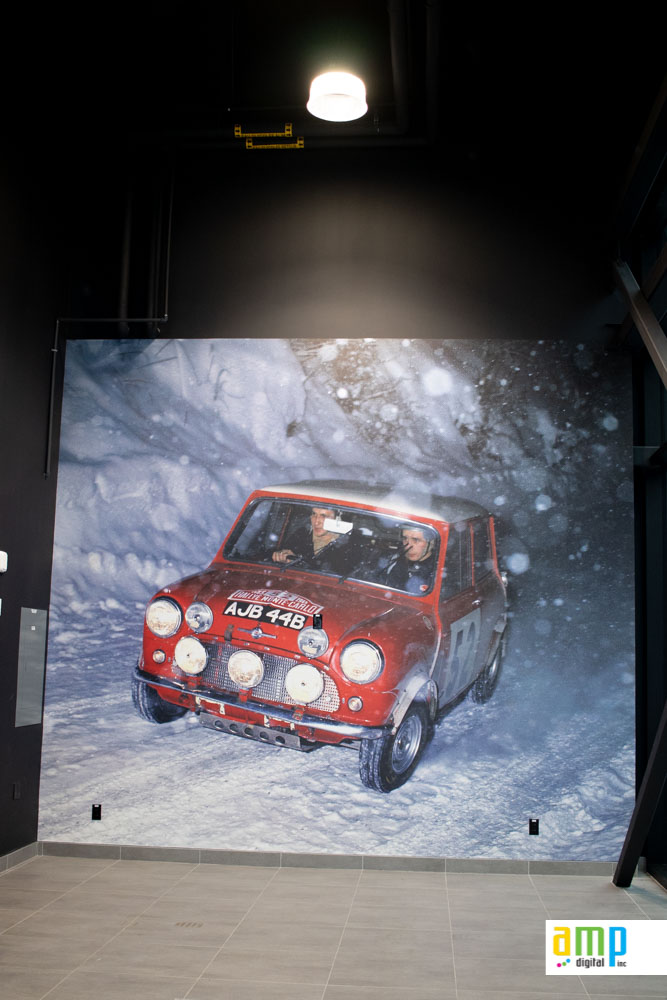
This test print was done for a wall art mural project at a car dealership. Some images were printed over 40 feet wide. We therefore wanted to be sure that the quality would be drinkable at the normal viewing distance. As you can see, we have selected key sections of the images so that we can validate the quality. One of his images was taken on a film camera and scanned afterwards. We were able to print it at the 20 x 20 foot format without a problem. Here is the realization below:
What size can you print a vector image?
A vector image uses mathematical calculations to display geometric shapes instead of displaying pixels of different colors. It is therefore possible to make geometric transformations with these shapes such as enlargements without losing any quality.
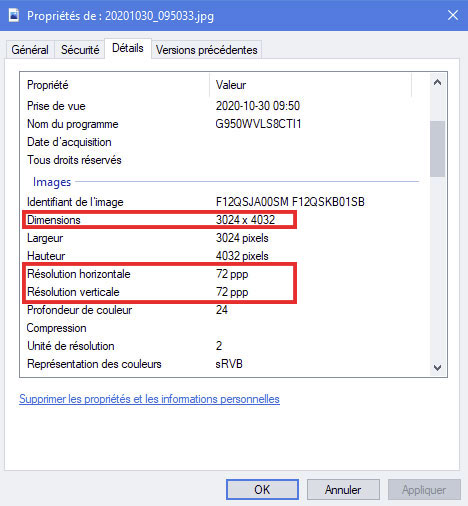
How do I find the dimensions of an image on a Windows computer (PC)?

- Open your file browser
- Use the right click on the image and choose “Properties”
- In the “Image” section you will find the dimensions of your image
- You will also find the resolution of your image in DPI.
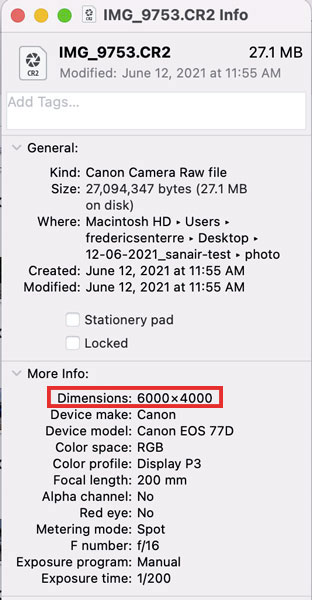
How do I find the dimensions of an image on an Apple Mac computer?

- Open your file browser
- Use the right click on the image and choose “Get more information”
- In the “More information” section you will find the dimensions of your image
On a Mac, you must use software to get the resolution (DPI) of your image because this information is not displayed in the file browser.

Need help printing your images in large format?
Our team has over 30 years of experience in the field, so don’t hesitate to contact us with your projects or questions.
